
Why You’ll Love This Recipe
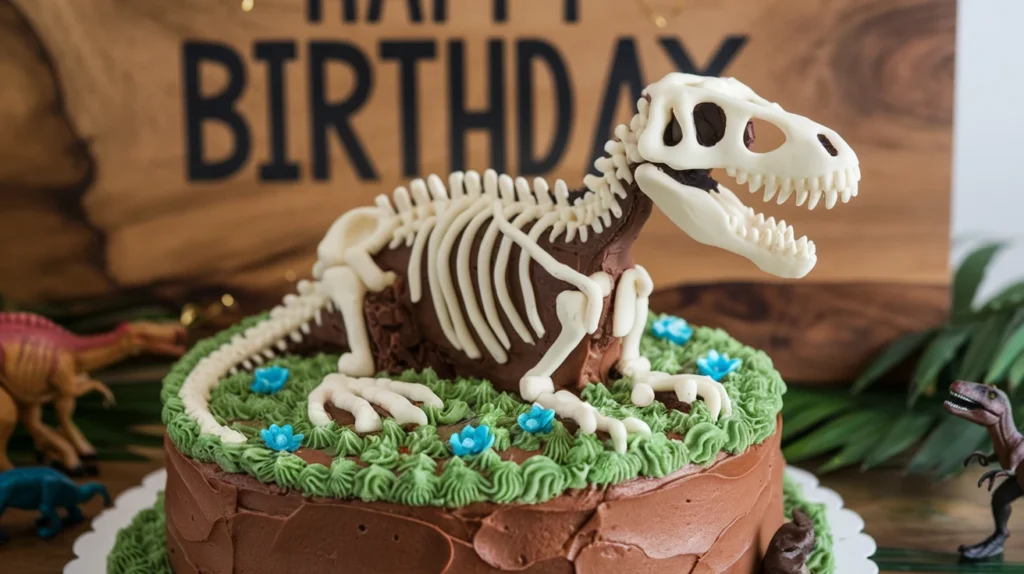
IDinosaur Skeleton Cake Recipe, you’re looking for a cake that’s as thrilling as it is delicious, this Dinosaur Skeleton Cake will absolutely steal the show. Designed to mimic a prehistoric dig site, this cake is a show-stopper for kids’ birthdays, dinosaur-themed parties, or anyone fascinated by paleontology. The skeleton design—crafted from white chocolate or fondant—rests atop a rich, moist cake base, often chocolate or red velvet to simulate earthy tones. You’ll love how fun it is to assemble, how jaw-dropping it looks once complete, and how each bite delivers comforting, homemade cake goodness under a whimsical, edible fossil display.
Ingredients
For the Cake:
- 2 cups all-purpose flour
- 1 ¾ cups granulated sugar
- ¾ cup unsweetened cocoa powder
- 2 tsp baking powder
- 1 ½ tsp baking soda
- 1 tsp salt
- 1 tsp instant coffee granules (optional, enhances chocolate flavor)
- 1 cup buttermilk
- ½ cup vegetable oil
- 2 large eggs
- 2 tsp vanilla extract
- 1 cup hot water
For the Chocolate Frosting:
- 1 cup unsalted butter, softened
- 3 ½ cups powdered sugar
- ½ cup cocoa powder
- 1 tsp vanilla extract
- 2–4 tbsp heavy cream or milk
For the Dinosaur Skeleton Topper:
- 1 cup white chocolate chips or white candy melts
- Dinosaur skeleton mold (silicone preferred)
- Optional: edible dust or shimmer for bones
Decoration:
- Crushed chocolate cookies (for dirt effect)
- Chocolate rocks or candy pebbles
- Green buttercream or fondant leaves
- Toy dinosaur figures (optional, for extra flair)
Directions
1. Make the Cake: Preheat your oven to 350°F (175°C). Grease and flour two 9-inch round cake pans.
In a large bowl, sift together flour, sugar, cocoa powder, baking powder, baking soda, salt, and coffee granules.
In a separate bowl, whisk buttermilk, oil, eggs, and vanilla until smooth. Gradually mix the wet ingredients into the dry mixture.
Slowly stir in hot water (batter will be thin).
Divide batter evenly between pans and bake for 30–35 minutes. Test with a toothpick—it should come out clean.
Let cakes cool in pans for 10 minutes, then transfer to wire racks to cool completely.
2. Make the Frosting: Beat softened butter until creamy.
Sift in powdered sugar and cocoa powder. Mix on low until mostly combined.
Add vanilla extract and 2 tbsp of cream. Beat on high for 2–3 minutes, adding more cream as needed for spreadability.
3. Make the Dinosaur Skeleton: Melt white chocolate chips or candy melts in a microwave-safe bowl in 30-second intervals, stirring in between.
Pour into the dinosaur skeleton mold, tapping to remove bubbles. Chill in fridge for 20–30 minutes until set.
Carefully remove the skeleton pieces and set aside on wax paper. If desired, brush with edible shimmer or dust.
4. Assemble the Cake: Level the cake layers if needed.
Place one cake layer on a serving plate or cake board. Spread a generous amount of frosting.
Top with the second layer and frost the entire cake. Use a spatula to smooth the surface.
Press crushed cookies around the top and bottom edges to resemble dirt.
Gently place the white chocolate dinosaur skeleton on top of the cake in an anatomically inspired layout.
Add chocolate rocks and candy pebbles for texture. Pipe small buttercream ferns or use fondant leaves for greenery.
Optional: Add plastic dino figures around the base or use a mini brush to dust “bones” with edible gold.
Servings and Timing
Servings:
This cake serves 12–16 people, depending on slice size. Perfect for parties!
Preparation Time:
- Cake Prep: 20 minutes
- Baking: 35 minutes
- Cooling: 1 hour
- Frosting & Assembly: 45 minutes
- Total Time: Approximately 2.5–3 hours
This timeline can vary slightly depending on your experience level and whether you prepare any parts in advance (e.g., skeleton topper).
Variations
Flavor Options:
- Red Velvet Base: Swap the cocoa for ¼ cup and add red gel food coloring.
- Vanilla Cake: Use a vanilla sponge and pair with chocolate or cream cheese frosting.
- Marble Cake: Swirl chocolate and vanilla batters together for a prehistoric layered effect.
Skeleton Alternatives:
- Use white fondant shaped by hand or with cookie cutters if you don’t have a mold.
- Royal icing on parchment paper can also be piped into bone shapes and allowed to dry.
Dinosaur Species:
- T-Rex, Triceratops, Velociraptor molds are common, but feel free to get creative with other prehistoric favorites.
Shape Variations:
- Use a sheet cake and decorate the entire surface like an excavation site.
- Try a dome-shaped cake for a volcano-dig hybrid theme.
Add a Surprise Center:
- Fill the cake with candy rocks or chocolate coins that spill out when cut—like discovering treasure underground.
Storage and Reheating
Storage:
- Store leftover cake in an airtight container at room temperature for up to 2 days.
- Refrigerate for up to 5 days if using perishable decorations like cream cheese frosting.
- Keep chocolate skeleton decorations cool and dry to avoid melting.
Freezing:
- Freeze unfrosted cake layers wrapped tightly in plastic wrap and foil for up to 2 months.
- Thaw overnight in the refrigerator before decorating.
Reheating:
- Serve at room temperature; cakes with frosting taste best when not chilled.
- Briefly microwave individual slices for 10–15 seconds to soften, if desired.
FAQs
Can I make the skeleton without a mold?
Yes! You can use fondant and sculpt bones by hand or with cutters. Alternatively, pipe melted white chocolate onto wax paper in bone shapes using a reference image.
Can I use store-bought frosting?
Absolutely. A good-quality chocolate frosting from the store works fine if you’re short on time. Homemade will give you the best texture and flavor, though.
What’s the best cake flavor for this recipe?
Chocolate is the most popular choice because it looks like “dirt” and contrasts well with the white skeleton, but any sturdy cake flavor will work.
Can I make this cake gluten-free?
Yes, just substitute a 1:1 gluten-free flour blend for the all-purpose flour and ensure your other ingredients are certified gluten-free.
Can kids help with this recipe?
Definitely! Kids can crush cookies, pour chocolate into molds, and help place decorations. Just supervise closely when working with hot melted chocolate or sharp tools.
Do I have to use edible decorations only?
Not necessarily. While edible skeletons are awesome, you can use clean plastic models for display if you prefer—they make great keepsakes afterward!
Conclusion
The Dinosaur Skeleton Cake is more than just a dessert—it’s an experience. Perfect for birthdays, parties, or themed events, it combines creativity, baking, and fun in a single project. It’s easy to adapt to any age group or flavor preference, and the stunning visuals make it a guaranteed centerpiece. Whether you’re celebrating a budding paleontologist or just looking for a unique and memorable cake idea, this one is a guaranteed crowd-pleaser.
MORE RECIPES HERE